


It’s easy to remove and reinsert your double hung window sash. Take a look at this video that outlines the steps. You can follow along with the instructions below as you watch the video, or print them out for future reference.
How to Remove a Double Hung Window Sash
Step 1: To remove the lower sash, begin by opening it. Lift up on handle as pictured, or turn the spoon, depending on the window series you have. (Note: Some windows may have a “window opening control device” that does not allow the window to be opened more than a few inches. If your window has that, press it in to disable it.)
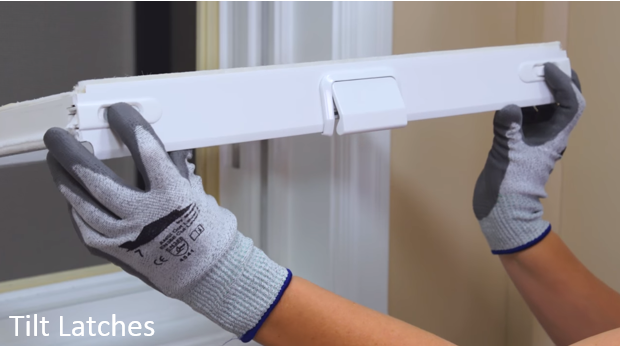
Step 2: Slide the lower sash up 4 inches. Press both Tilt Latch Buttons that are on the top of the sash until they click. You’ll find these at the left and right ends of the sash.
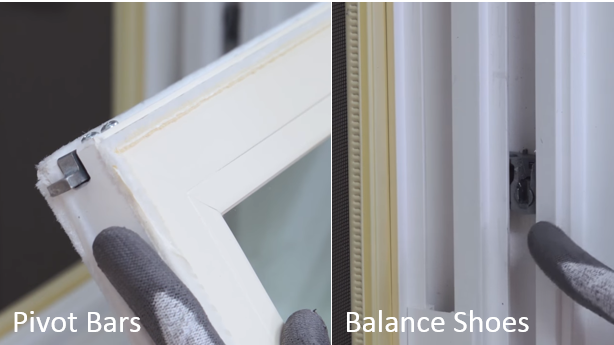
Step 3: Rotate the sash towards the inside of your home until it is perpendicular to the wall. Lift up on one side 2 inches and then the other side. Make sure the pivot bars are not connected to the balance shoes and rotate the window out of the frame.
Step 4: Once the lower sash is removed, you can proceed with the upper sash. Slide the upper sash down until it is about 6 inches higher than the window sill. Press both Tilt Latch Buttons that are on the top of the sash until they click and repeat step 3.
How to Reinstall a Double Hung Window Sash
Step 1: To reinstall the sashes, begin with the upper sash first. Hold it perpendicular to the wall. Place one pivot bar into the inner balance shoe and then do the other side. Make sure the pivot bars are fully seated into the shoes on both sides and give them a little pat to secure them in place. This will help avoid any potential damage to the window before proceeding to the next step.
Step 2: Rotate the sash upward to make sure one side does not drop. Push the sash until it contacts the frame fully to engage the tilt latches. To ensure it is inserted correctly, try to pull it away from the frame just a little with a tug forward. It won’t pull away if the tilt latches are engaged correctly. If they are not engaged correctly, push the sash again until it does contact the frame.
Step 3: Slide the upper sash up and down to check the full range of motion.
Step 4: Now it’s time to replace the lower sash. Begin by holding it perpendicular to the wall. Follow the same process you did in step 1 when you reinstalled the upper sash. Continue to step 2. If you cannot get the tilt latches to engage correctly, call 1-800-Milgard for service.
Step 5: Slide the lower sash up and down to check the full range of motion. Check the operation of the handle or spoon to make sure the hardware has engaged. If it has not engaged, make sure the upper sash is all the way up and the lower sash is all the way down.
You can find more “How To Videos” on milgard.com.